I reviewed my Art Goal list for 2008 and find that I'm pretty much repeating it for 2009. I've added some specificity to it with the hopes that I'll achieve more this year!
Here's my art list for 2009:
1 - Plein Air work - at least once per month
2 - Do art daily - can be sketch in a journal or painting
3 - Work and study art books and DVDs
4 - Take workshops and/or classes - either online or "live"
5 - Finish my food blog so I can have the cookbook printed at the end of the year - must do at least one post per week.
One idea I got from Ann in the EDM online group was to mark off the art goals on a calendar. She prints her calendar from this site. I decided to use this printed calendar, which prints onto one page, and will color code my art goals onto each day using the following key:
Yellow = Plein Air work
Red = Journal work
Blue = Painting
Green = Food blog
I can also list the books/DVDs/classes/workshops on the back of the calendar or footnote them on the front.
Wednesday, December 31, 2008
Wednesday, December 24, 2008
Christmas Corsage
I'm one of the wedding coordinators for our church and we've had three weddings this December. This is my interpretation of a corsage from one of those weddings. Decorations of pine boughs, pine cones and green and mocha colored ribbons were stunning. I brushed some gesso onto a sheet in my Lama Li sketchbook in a zigzag pattern before sketching and painting. The gessoed areas took the paint much differently than the bare paper. A fun technique I learned from KreativeKay at WetCanvas www.kaysmithbrushworks.us/

Monday, November 24, 2008
Nov VSD on Dumpr
There's a fun little "toy" through flickr called dumpr.net
I couldn't resist and just had to see what the VSD image did when it got "dumpred" -- I thought it turned out interesting and I rather like it!
I couldn't resist and just had to see what the VSD image did when it got "dumpred" -- I thought it turned out interesting and I rather like it!
Saturday, November 22, 2008
Nov VSD on Yupo
The November Virtual Sketch Date reference photo is just beautiful, but I found it quite a challenge for painting on my beloved Yupo. I got the composition all wrong, the horizon line is dab smack in the middle and I didn't even realize it until I was finished-UGH! Using the Kevin Davidson style of laying in the background wash on an easel and letting it run (really, it's like a pour) means than you can't redo the backgroundg once it's down and dry. So while I could've washed away the horizon, I wouldn't have been able to fix the sky. So . . . it's DONE. This is more in keeping with Kevin's style and I'm convinced that this is not the style for me. As much as I love Yupo, I'm finding working on it to be more work than fun and am thinking of taking a little break from it.
Thursday, November 13, 2008
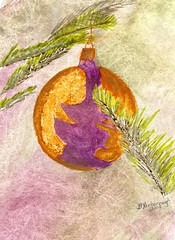
Ornament on Tyvek
I've got a few ref photos that I'm painting for my Christmas cards this year. This is the first one, done on tyvek with DS paints. I painted the background and then rubbed it in with a tissue so the wonderful texture of tyvek could shine through. After I paint all the Christmas scenes, I'll print them out onto cardstock and am thinking of touching them up with iridescent paint.
Wednesday, November 12, 2008
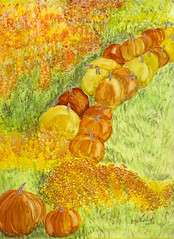
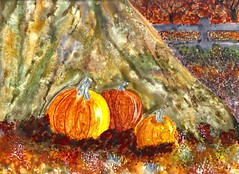
Pumpkin LineUp On Yupo
9 x 12 Translucent Yupo using AJ paints. I've used the translucent Yupo just once before and didn't care for it. I thought I'd give it another try. . . I still don't care for it, LOL! This is a bit more like Kevin Davidson's style. I still want to work some more pieces using his style before I start incorporating other styles into it to make it my "own." I taped the Yupo sheet to a foamboard and placed it on an easel. I then laid down a wash with yellow and green and let it dry completely. I worked the rest of the painting on top of the underlayer. Kevin wipes off the areas for his subjects, but with the light value of wash, I just painted the entire painting on top of the underlayer and it seemed to work fine.
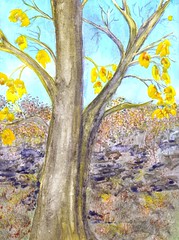
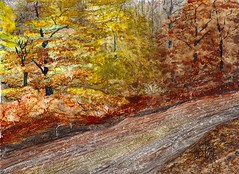
Wednesday, November 05, 2008
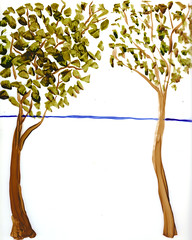
I REALLY tried to do this Yupo using Kevin Davidson's technique. . . just couldn't "get it!" I attended Kevin's workshop at the Pasadena Art Expo and absolutely LOVE his work on Yupo, and will continue to experiment with his methods. Kevin works on an easel and he doesn't layer like George James or Taylor Ikin do. Kevin lays in the background as a wash - which really runs right down the slick surface of the Yupo. After that dries, he washes off the areas where the subjects/objects are to be painted and paints them in. One area at a time is painted and allowed to dry before the next area is painted. After three attempts, I finally gave in and incorporated a little bit of George James (the sponge roller technique) and am somewhat happy with this. I did keep the "drippy" background and did clear off the area where the lighter yellow and gold trees are, but found that I couldn't get the leaves to look right without a roll from the sponge. The stream on this doesn't read right, but I'm finished with working on it. One of the really cool attributes of Yupo is it can be washed off -- which I did NUMEROUS times and in various areas - LOL!
Friday, September 26, 2008
Pumpkins and Tree Trunk on Yupo
It's that time of year again! I love Autumn -- the season of harvest. I love the color changes and the cooler (but not cold) temps. I haven't posted in a long time. . . just not been able to paint anything post worthy. It's been a long slump, but I feel like I'm coming out of it. There's several things about this little scene I'd do differently, but at least I felt some creative juices flowing while I worked on it. And I do so LOVE Yupo and all the little surprises that just "happen
Thursday, August 28, 2008
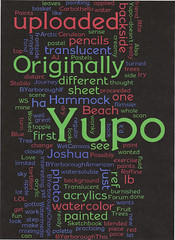
This was fun! I popped in on some blogs I haven't visited in a while and read on Felicity's blog about "wordle." You type in the url of your blog and Wordle takes the most used words from the recent posts (I don't know what their actual definition of "recent" is) and then they put the words together. You can't save the finished product, but you can print it, scan it and then post it as I've done here. If you look back on my recent posts, you'll see how they've come up with my custom wordle!
I've been in the midst of an artistic slump. I've been painting, but nothing is working, nothing is postworthy!! I've gone back to the basics. . . thumbnails sketches, preliminary sketch/wash, and still I'm failing. I've tried looking at art blogs, looking through some of my art books, using different mediums and still. . . nada! I absolutely adore Yupo and am so frustrated that I don't seem to be able to paint on it anymore. I did this wordle and somehow it's inspired me to keep on keeping on, I've got to just hope that this slump will not only end, but that I'll grow in my skill through this process.
I've been in the midst of an artistic slump. I've been painting, but nothing is working, nothing is postworthy!! I've gone back to the basics. . . thumbnails sketches, preliminary sketch/wash, and still I'm failing. I've tried looking at art blogs, looking through some of my art books, using different mediums and still. . . nada! I absolutely adore Yupo and am so frustrated that I don't seem to be able to paint on it anymore. I did this wordle and somehow it's inspired me to keep on keeping on, I've got to just hope that this slump will not only end, but that I'll grow in my skill through this process.
Tuesday, August 05, 2008
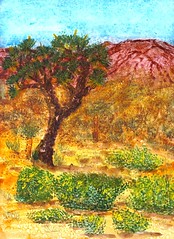
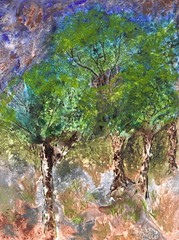
Joshua Tree on Yupo
American Journey Paints on 9 x 12 Yupo. Love my new AJ paints, very creamy. I have a limited palette, so did a whole lot of mixing for this. The scan didn't turn out too well, the sky is Arctic Blue (which is Cerulean). I'm really not fond of Joshua Trees, but a friend of mine wants me to paint one for her and I'm practicing!!
Saturday, August 02, 2008
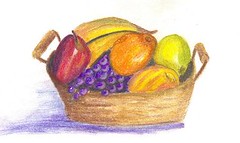
Fruit WS Pastels
Change of pace! This is just a little exercise I did for the Watermedia Forum on WetCanvas. It's in my Raffine Sketchbook and done with Stabilo Carbothello watersoluble pastel pencils. I wanted to see how these pencils would work if I blended and burnished with a tortillon before I applied water. Worked great! The basket is wonky (as it was in the ref photo) and the red apple looks like it's ready to topple out (NOT as in the ref photo) ha ha. A fun change, but I've gotta get back to my Yupo - LOL!!
Tuesday, July 29, 2008
Beach Hammock 2 - on Yupo
If you look closely, you can see the leaves from the acrylic painting on the backside of this sheet of translucent Yupo. This wasn't as different and interesting as I thought it'd be. Possibly a different scene with maybe just distant background painted on the backside with acrylics and no watercolor on top of it on the frontside. I'll try again. Also, the translucent Yupo is 104 lb and yet it is flimsier than the 74 lb regular Yupo--doesn't make sense to me.

Beach Hammock 1
This is the first step for my first Translucent Yupo piece. I painted these trees on one side of the Yupo with fluid acrylics. Then I let it dry and turned the sheet over and proceeded with the watercolor.
Monday, July 28, 2008
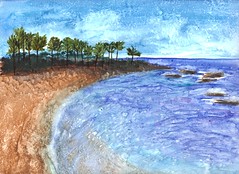
Beach on Yupo
DS paints on 9 x 12 Yupo. I found this ref photo on WetCanvas and thought it was a simple scene to try the lighter approach on. I ended up using George James' paint roller technique , but did stick with Kevin Davidson's lighter layers technique. I still can't quite get the smooth coverage Davidson gets! I'm not ready to give up, will try, try again! I'm pretty sure he must use a thicker water/paint mix -- maybe the consistency of cream. I'll try that on the next go around.
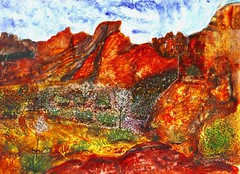
Sunday, July 27, 2008
DS Paints on Yupo 9 x 12. I saw some of Kevin Davidson's work on Friday at the Laguna Beach Art-A-Fair and absolutely LOVED what he is doing on this support! I started this piece out trying to emulate his lovely handling of watercolor on Yupo and failed. I reverted back to mixing a little bit of George James' and Taylor Ikin's techniques. I'm not giving up -- but absolutely couldn't get his clean strokes and oh-so-light layering on this piece. I think I need to use a very simple composition --which believe it or not, I thought I was doing with this desert scene. . . but it grew and grew and grew. LOL! The photo ref just had some sage and distant junipers. . . I decided it was going to BLOOM.
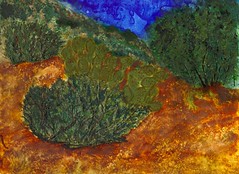
Thursday, July 24, 2008
Desert on Yupo
DS paints on Yupo and this time I tried something new! I used YES! paste and tissue paper on the Yupo to get a "collage" type texture for the foremost bush and also the one in the back left. I let this dry and then proceeded with applying the layers of paint. I used the George James technique of smoothing with a sponge roller not just on the first layer, but also on subsequent layers and especially for the ground. I thought it really gave me a good "dirt and sand" look. I used Taylor Ikin's technique for the sky and also for the large bush on the right and back. I tried something new with the prickly pear cactus and just did regular brush stroke painting, very carefully so as not to disturb the underlayers, and then I speckled it with a stippling method. This works only if you make ONE stroke. In the George James DVD, he tells that it is not the water or the paint that causes the underlayers to lift, it is friction on top of the new wet layer which can be caused in several ways, one of which is the brush. All in all, this was a fun project and I just keep striving for more Yupo knowledge!!
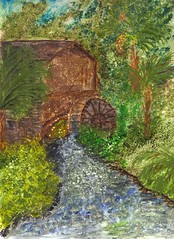
Sunday, July 20, 2008
Waterwheel on Yupo
DS paints. Photo ref from WetCanvas. I continue to experiment with painting on Yupo. I tried one of George James techniques on this one, I'm still trying to figure out how I want to meld some of Taylor Ikin's and George James' techniques into my own style. The technique from James that I used is spraying with a mist of water, laying a tissue over the area and then rolling over the tissue with a small sponge house painting roller. This removes the pigment and creates a white splatter effect. It's all just part of the journey!
Tuesday, July 15, 2008
Abstract Cactus on Yupo
I just wanted to have fun with Yupo -- I know absolutely NOTHING about abstract painting, but I'm going to call it that. LOL! I sectioned off nine uneven squares and painted them with the same colors and really just let the paint do what it does best on Yupo -- whatever it wants! After all the squares dried, I did some cactus plants. . . it's DIFFERENT, that's for sure!! And I did have fun watching it flow and form interesting shapes.

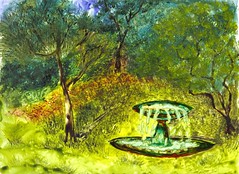
Saturday, July 12, 2008
Fountain Revised - on Yupo
The more I looked at the first fountain, the more I disliked it. So I decided to wipe off all the foreground and much of the middle ground and redo it. After all, wiping off COMPLETELY is one of the advantages of Yupo! I wanted to save the fountain, so was very careful about wiping around it with water-wet brushes and Qtips.

Wednesday, July 09, 2008
Fountain on Yupo
DS paints on Yupo. I've worked and worked this one and feel I just have to quit because I'm getting too fussy. I laid out the first layer and then wiped out the area for the fountain. Because I thought the fountain was going to be the most difficult, I painted it first and was quite happy with the patina I got using the UM Turqouise mixed with a tad of Manganese Blue Hue and then touches of Quin Gold -- really shooting for the look of copper that has verdi patina from age. After it dried, I dripped some water on with an eye dropper and then blotted with a tissue. Then I wiped up and defined my "drips" using a very small scrub brush. I used very diluted Indianthrone Blue on the "drips" and the water in the fountain. Next I tackled the trees and the fg grasses. The tree branches were laid in on the very first layer and the one on the left dried just perfectly! I didn't do anything more to it and the way the paint dried determined where my sunlight was going to be coming from. I struggled with shadows and shade -- this seems to ALWAYS be my struggle!!
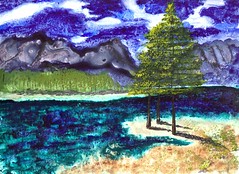
Monday, July 07, 2008
Canadian Lake on Yupo
I used several new DS paints on this. Their newest triad, Sand and Surf, provided the Indianthrone Blue that is the distant mountains, the Ultramarine Turquoise which is used on the lake and Goethite, which is the brown areas in the foreground. I also had bought Shadow Violet, which I used with the Indianthrone on the mountains and for the tree shadows. The lake also has a bit of manganese blue hue and ultramarine. The foreground has buff titanium (the lighter areas). The photo ref for this is from WetCanvas and is, in fact, a July challenge.
I really had a difficult time with the sky on this! I wiped it completely off and tried again. I'm still not thrilled with it. . . I think I REALLY need lessons on clouds!! And then I found myself getting too fussy with the trees and made myself STOP.
I really had a difficult time with the sky on this! I wiped it completely off and tried again. I'm still not thrilled with it. . . I think I REALLY need lessons on clouds!! And then I found myself getting too fussy with the trees and made myself STOP.
Friday, July 04, 2008
Stone Bridge on Yupo
This is the same photo ref I used a couple of months ago for a "traditional" watercolor. I just had to give it a go with the Yupo and DS paints. I'm trying to combine some techniques. . . and here are my goals. I want to create texture with both the natural flow of watercolor on Yupo as well as some stippling and other brush strokes. I want the vegetation to be "fluffy" and the water to be "flowing." I'm having so much fun trying to "go with the flow on Yupo" and also reining it in with brushstrokes and more pigment in certain places. It sure has been a fun challenge thus far and I'm constantly thinking of things I want to try "next time!"

Wednesday, July 02, 2008
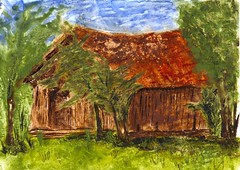
Country Shack on Yupo
This photo ref was one I used recently for a painting on regular watercolor paper. I'm trying to get some detail on the layered Yupo and find that if the layers are thoroughly dry AND if there is the correct ratio of water to pigment (it's about the consistency of thick cream) then fine lines can be laid down without lifting the under layers. The roof on this was too thick and I couldn't get it to develop into interesting texture by spraying it with water. After accidentally lifting too much pigment off and having to re-layer, I dabbed it very lightly with a waded piece of tissue. At first I didn't like the effect, but now that it is finished I think it made it look aged and I DO like it. Here again, I'm using the DS watercolors and the shack is primarily painted with the new Goethite that is part of the Sand and Surf Triad.
Monday, June 30, 2008
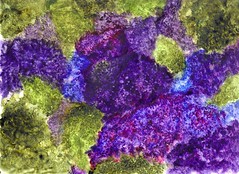
Hydrangeas on Yupo
If I didn't have a title, no one would be able to figure out that I was trying to paint hydrangeas! This was much harder to pull off than I thought it'd be. I am still having fun with Yupo and have some ideas for something a bit different. . . we'll see how it goes. One thing about this support, if you don't like it, just put it in the sink and wash it off - ha ha.
Thursday, June 26, 2008
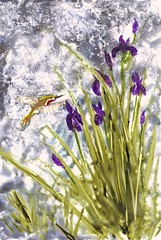
Hummingbird and Wild Flowers on Yupo
DS paints on Yupo. I masked the area for the bird, then I sprayed the sheet with water. I applied the gray background, smashing of pigment onto the Yupo as I've done the previous works. Then I used the side of the flat brush and painted in the leaves. Just before it was dry, I used the same brush and wiped out some lines in a few of the leaves. I let the piece dry completely before painting the flowers. Then I finely misted the flowers (using my hand as a shield to keep from getting water on the leaves. I pulled the mask off, which was hard to do on this because you can't really rub the painted area too hard. Truly, it would have been easier to just use a brush and clear water and wipe out the area for the bird. Then I painted the bird.
Wednesday, June 25, 2008
CA Wildflowers on Yupo
I wanted to see if I could do something besides a dark forest scene! The ref photo for this was one taken near the little town of Gorman. During "good" wildflower years, the mountains there look like someone flew over in an airplane and poured gallons and gallons of colored paint all over the mountains and valleys -- it's just beautiful! Someone asked how long it takes for my layers to dry on Yupo and I'm afraid I can't answer that. The first layer is the wettest because I've sprayed the Yupo pretty heavily with water and then add pigments. The successive layers are heavy pigment and then a fine spray of water (from an empty hair spray bottle) and I work under a light so I make sure I'm not spraying too much water. Sometimes I don't spray enough and after that first spray has dried, I'll spritz it again. I live in a very dry climate so my Yupo paintings probably dry faster than the norm. I do a layer and then go do housework, laundry, run errands (really whatever it is I need to do). It usually takes me about 6 hrs to complete one painting -- but the ACTUAL painting time is only about 1 hr.

Tuesday, June 24, 2008
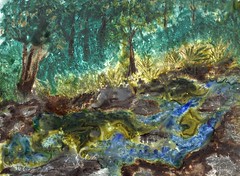
Stream in the Forest on Yupo
I think I'm getting a handle on this technique. . . my paintings are looking at least a little similar to the photo refs. I'm still using DS paints. I truly love working on Yupo, it's so unpredictable and spontaneous.
Monday, June 23, 2008
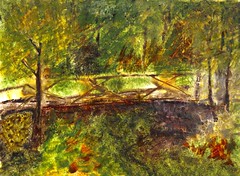
Forest Bridge on Yupo
Another expressionistic piece on Yupo using DS paints. This one is actually pretty close to the ref photo, which I found on WetCanvas. It has multiple layers and multiple water sprays -- I honestly lost count, but there are at least 6 layers in some places. I'm continuing to have a blast with this technique on Yupo.
Thursday, June 19, 2008
Lagoon on Yupo
This is the first Yupo I've done lately that actually is similar to the photo ref! Also, this is more impressionistic than yesterday's (which most defnitely was expressionistic with a touch of abstract) LOL! I'm still having a blast working on Yupo and still using DS paints.

Wednesday, June 18, 2008
TREES AT CANYON EDGE
I can't believe how much fun I'm having with Yupo and watercolor!! This one started out to be Joshua Trees in the desert - LOL! Yupo really dictates what it wants to be -- so, trees at the edge of a canyon drop is what we have here! I really loved how the paint for the tree bark reacted. I keep forgetting to tell the sequence of painting these. . . choose the subject or photo ref first (I don't know why, because it doesn't turn out to be that anyway), choose your palette and squirt some paint in the pans (keep it moist -I'm covereing my palette with Press and Seal plastic wrap), spray the Yupo with a bit of water (enough so there are visible drops all over, but not running), using a large flat brush apply the pigments to the Yupo (do NOT add water to the pigments in the palette pans), squish and stroke the paint all over the Yupo putting your colors in the basic area that the photo ref shows you. Let dry. After it dries, see what it wants to be and then proceed by lifting paint and/or adding paint. Squirt with water - just a little fine mist. Let dry in between each layer and add a few little details if you want and call it done!
I can't believe how much fun I'm having with Yupo and watercolor!! This one started out to be Joshua Trees in the desert - LOL! Yupo really dictates what it wants to be -- so, trees at the edge of a canyon drop is what we have here! I really loved how the paint for the tree bark reacted. I keep forgetting to tell the sequence of painting these. . . choose the subject or photo ref first (I don't know why, because it doesn't turn out to be that anyway), choose your palette and squirt some paint in the pans (keep it moist -I'm covereing my palette with Press and Seal plastic wrap), spray the Yupo with a bit of water (enough so there are visible drops all over, but not running), using a large flat brush apply the pigments to the Yupo (do NOT add water to the pigments in the palette pans), squish and stroke the paint all over the Yupo putting your colors in the basic area that the photo ref shows you. Let dry. After it dries, see what it wants to be and then proceed by lifting paint and/or adding paint. Squirt with water - just a little fine mist. Let dry in between each layer and add a few little details if you want and call it done!
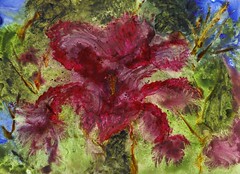
Yupo Iris
My second attempt using Taylor Ikin's technique. This started out to be a cherry blossom -- can you believe that? But as it flowed and dried, the Yupo and paint decided it wanted to be an iris. So. . . being the dutiful artist, I let it! My subsequent layering tried to mold this into an impressionistic iris. I have to say, I'm having a BLAST working with this stuff and trying out this technique. I think I spray it with water more than Taylor does, but hey, we've gotta add our own signature, right? Btw, I'm using DS paints on these Yupo paintings.
Tuesday, June 17, 2008

Dark Woods Stream on Yupo
Woa! Impressionistic, Dark, Bold!! This is something VERY different for me!! I LOVE working on Yupo and I think it's because it forces me to be loose. I love how the paint chooses where it's going to flow and you either follow the paint or suffer frustration. I viewed a fantastic video last night called "Dancing with Yupo" by a wonderful artist, Taylor Ikin. Taylor teaches how to lay down heavy paint and then add brush strokes and water and really just let it do it's own thing. You can coax a little here and there and model the paint here and there, but ultimately the paint is going to decide what the painting turns out to be. This was fun and certainly not even close to what I would hope it would be, but I'm satisfied with it as my first attempt at this style. Take a look at Taylor's work here http://www.taylorikin.com/index.htm I think you will be blown away!
Tuesday, June 10, 2008
 Misty Mountain Road
Wow - this was TOUGH! I'm afraid I picked a difficult ref photo over at WetCanvas, but I just loved the scene and couldn't pass up the challenge. I haven't painted in a while, because I've been taking art journaling classes and been busy keeping up with lessons, and so I'm quite rusty with the brushes! I did a little resarch through my personal art library on painting fog or mist. Many tips and techniques are written about this effect, and many have one area of agreement. . . paint wet-in-wet. Also, it seems that most agree that lifting with a tissue will give a fog effect. That good old master, Edgar Whitney, suggested using an atomizer to mist with water and then I read that Susan Bourdet likes to use white goauche. So, I decided to try all the above - LOL - and since I really love using my little atomizer and hardly ever do, it was a natural little toy to resurrect. I used white goauche with just a smidgeon of payne's grey in my atomizer and just misted the heck out of this. What fun -- I just LOVE old-fashioned tools of the trade. For those of you who may not be familiar with this little goody (that gives an airbrush effect), you can see it here http://www.dickblick.com/zz034/00/ There is a trick to working this effectively, the tube that runs vertically will move -- it fits in it's sleeve stiff, so it takes a little bit of pushing. You have to push it up so that it touches the tube that runs horizontally (which is the one you blow through). It needs to be up above the edge of the horizontal one, actually almost to the top edge of the horizontal one. And that's the secret, you just blow through the mouthpiece and a super fine mist comes out. Be sure to use a piece of paper to shield areas you don't want sprayed, though. A little "helper" that I figured out the last time I used this is one of those plastic vials that cut flowers sometimes come in. I fill the vial with my medium and then put the atomizer tube in it and it's quite easy to hold them together with one hand, freeing up my other hand to hold the paper shield. Fun! And it truly DID make a huge difference in this painting -- the wet-in-wet and lifting with a tissue didn't work that great for me. Possibly because it's so blasted hot and I live in the dry desert and I couldn't keep my paper wet!
Friday, May 16, 2008

Descanso Garden Wagon
Done on Strathmore watercolor paper (11 x 15) using DS paints. I painted this several weeks ago and posted it on my flickr and COMPLETELY forgot to post it on my blog! The wagon really IS blue and I used DS Sleeping Beauty Turquoise to capture it. It was too large for my scanner, so I took a digital image which turned out a bit fuzzy, definitely the photographer and not the camera! I've not been painting much for a variety of reasons. I took Jessica Wesolek's "Love This Journal" class at the end of March. It is a lesson-a-day for 21 days course designed to get a person in the journaling habit. It is a wonderful class with lots of very creative ideas for the students to either duplicate or expand upon. I liked it so much, I enrolled in the second class which started on May 5 and runs for 6 weeks with 3 lessons per week. If you want to check out Jessica's classes, they are here http://www.dotcalmvillage.net/ and click on "online workshops."
I've also become slightly addicted to doing art on prepaid cards or envelopes. David Mills, who lives in the UK, started a flickr group for this art and you can check it out here http://www.flickr.com/groups/666306@N25/
I went to Las Vegas for a week to visit my daughter and her family at the beginning of May -- lovely visit and plenty of time with my baby granddaughter, who is already 6 months old! She's just beautiful, and so much personality!! My trips to Las Vegas are basically every 6 weeks or so -- it's a short 4 hr drive with three nicely spaced Starbucks pit stops along the way - LOL!
Saturday, April 05, 2008
 Painted with DS paints on Lama Li paper (7 x 9). Reference photo is from WetCanvas. Lin at http://viewfromtheoak.blogspot.com/ and I are both taking advantage of a class at WetCanvas on painting water. What a terrific class it is already!! Also, the April theme in Kate Johnson's alumni group is "water," how cool that there are TWO groups to submit the same paintings to this month.
I was fairly happy with this, of course there are always parts I would do differently. I wonder if excellence will ever be achieved?! At first I liked the lavender in the water, but now I'm not so sure. I think the bridge reflection should be more pronounced, even though it wasn't in the photo. Sometimes it's hard to figure out where to take artistic license. I guess that just comes with PRACTICE!!
Thursday, March 27, 2008

Lin's River
Done on Lama Li with DS paints. Photo ref was from Lin Frye. I painted the background first, wet-in-wet, using a band of Fr UM at the top and then switching to Indigo and Sedona (mixing on the paper) and then scraped in the trees when the sheen had left the paper. After it was completely dry, I painted some of the trees and did the ones in the foreground with more detail. It was a fun exercise -- and my first heavy wooded forest! Thanks, Lin, for the tip on scraping in those trees!!
Monday, March 24, 2008

Easter Lily 2008
I'm a day late - but Happy Easter everyone!! This painting gave me FITS!! It's on canson block using DS paints. I completely covered the background with graphite pencil first, then laid in two layers of indigo paint--wanted it as close to black as I could get. That part was successful. I painted the leaves next and that went okay. I erased my pencil lines on the flowers before I started painting them and THAT'S where I ran into trouble. I'm pleased with the lower two flowers and with the bud behind the middle flower, but the flower on top!! Ohmygoodness!! I had such a time especially with the lower petal and I've overworked it and absolutely can't scrub out and start over ANYMORE - so this is it.
Tuesday, March 11, 2008
 Parrots in Love!
Done on Lama Li using DS Paints. This is a March project for the yahoo group, Watercolor Workshop. It was fun to work with tube paints after working with w/c pencils so much lately. I AM thinking about redoing this using pencils, though, for an upcoming lesson on birds/animals. It was a good ref photo and I enjoyed painting it.

Tulips
Done on Lama Li paper with Derwent Inktense watercolor pencils. Still working on projects for my class. The reference photo for this was found in WetCanvas. Not much to say about this one. . . I see plenty of places with room for improvement, particularly in the leaves. I like the foreground yellow tulip and the purple tulip on the right, but don't like the other two blossoms. I almost forgot! This was drawn with colored pencil -- so no erasing, and that's a stretch for me!!
Monday, March 10, 2008
Pink Flower
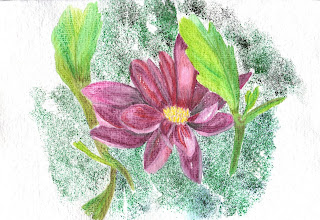
The photo reference was posted on Watercolor Painting Techniques yahoo group for a March project. Since I'm currently in Kate Johnson's watercolor pencil class, I figured this would fit the lesson on flowers! I used Derwent Inktense watercolor pencil on Lama Li paper. The background is a technique I read about in a Karlyn Holman book where you wet the watercolor paper and then sand the pencil tips with 100 grit sand paper. It's really fun and easy! Just cut a piece of sand paper into a square, it needs to be small enough to fit in your cupped hand. Choose the color/colors of pencils you want to use, wet the paper in small segments at a time. Rub the tip of the dry pencil across the sandpaper, that is cupped in your palm -- kind of a funnel shape cup-- and direct the shavings onto the wet portion of the paper. Let it dry and then hold it over a trash bag/can and blow the residue off. Continue on, doing a small portion at a time, be very careful not to wet the part that's already been done or it will run. Surprisinging enough, very little pencil is wasted. I sanded and then tapped the paper and then sanded and tapped again -- repeating in this way kept the pigment from building up on the sandpaper."

The photo reference was posted on Watercolor Painting Techniques yahoo group for a March project. Since I'm currently in Kate Johnson's watercolor pencil class, I figured this would fit the lesson on flowers! I used Derwent Inktense watercolor pencil on Lama Li paper. The background is a technique I read about in a Karlyn Holman book where you wet the watercolor paper and then sand the pencil tips with 100 grit sand paper. It's really fun and easy! Just cut a piece of sand paper into a square, it needs to be small enough to fit in your cupped hand. Choose the color/colors of pencils you want to use, wet the paper in small segments at a time. Rub the tip of the dry pencil across the sandpaper, that is cupped in your palm -- kind of a funnel shape cup-- and direct the shavings onto the wet portion of the paper. Let it dry and then hold it over a trash bag/can and blow the residue off. Continue on, doing a small portion at a time, be very careful not to wet the part that's already been done or it will run. Surprisinging enough, very little pencil is wasted. I sanded and then tapped the paper and then sanded and tapped again -- repeating in this way kept the pigment from building up on the sandpaper."
Thursday, March 06, 2008

Battery Point Lighthouse in Crescent City, CA
Crescent City is in northern CA, at the Oregon border. It rains a whole lot there and so Battery Point is covered with green moss! This is done on Lama Li paper and I used DS paints for the sky and the water and Derwent Graphitint watercolor pencils for the rest. Still working with w/c pencils for my class with Kate Johnson. I'm not real thrilled with this, but have some nice ref photos of Battery Point so will probably do another one or two.
Wednesday, March 05, 2008
 Pt Arena Lighthouse - Second Attempt
This is a redo where I applied the suggestions made by Kate Johnson in the watercolor pencil class. I raised the waterline to be a little bit above the landline and lowered the lighthouse so it wasn't topping the edge of the paper. This one is not totally done in watercolor pencil. It is DS Watercolor paint and Derwent Graphitint pencils done on Lama Li paper. The only area where I used the pencils is the cliff, the rest of it (including the rocks in the water) were done with tube paint. I was pleasantly surprised at how well the pencils worked on the Lama Li! I really, really like the graphitint pencils for certain subjects and I like my Lama Li!! What a wonderful union - LOL.
Saturday, March 01, 2008

Pt Arena Lighthouse
Lesson 3 of Kate Johnson's watercolor pencil class. Done on Arches CP block using Derwent Inktense Pencils and Derwent Graphitint Pencils. This scene combines our exercises for lesson three which is water, skies and rocks. I've combined a lesson with a challenge because in WetCanvas, there is a March challenge to do lighthouses. When I read about that challenge, I immediately thought of Pt Arena Lighthouse which I've been to and even climbed to the top! It was interesting, exhausting (ha) and an awesome view!! This lighthouse is located in northern CA and sits on the San Andreas where that fault enters the Pacific Ocean. The great San Francisco Earthquake of 1906 destroyed the original lighthouse and it was rebuilt in 1907. It is 6 stories tall. You can see some awesome aerial shots of it and read more about this interesting lighthouse here http://www.mcn.org/1/palight/
Tuesday, February 05, 2008
 Watercolor Pencil Class with Kate Johnson
Lesson 1a
This is done on Strathmore Art Paper (pink) with Derwent Inktense watercolor pencils. The water and the sky were done with five light layers. The process was color, followed with a wet brush that had been wicked on a sponge before each stroke, dry thoroughly and then repeat. The sky and the reflections on the water are primarily the pink paper, with a little bit of Chili Red pencil. Tangerine pencil is at the skyline. The pink in the foreground is the only area where the pink is pure paper. The distant trees and mountains were a single, heavy layer of a combination of Ink Black, Deep Indigo and Bark which I used a wetter brush on and drug the pigment into puddles and also into the skyline to get a jagged edge. The foreground is a light coloring of Bark on the ground and a combination of Deep Indigo and Ink Black on the blades of grasses. Light water was applied to the foreground. I'm pretty satisfied with this, especially since it's the first watercolor pencil I've done in months and months! The reference photo is from the reference library on WetCanvas and can be viewed here http://www.wetcanvas.com/RefLib/showphoto.php?photo=34786&si=southwest
Friday, January 25, 2008

Revised!
Doug at WetCanvas gave me some good instruction on fixing the spot of sun. Then I realized that the tree trunk needed to be more shaded, after all the sun is on the other side. One of those "slap myself on the forehead" revelations! I'm much happier with this. . . not perfect, but improved.
Thursday, January 24, 2008

Jazz Alley Triad 4 - Winter Scene 2
Another one using a photo ref from the WetCanvas January challenge for winter scenes. This is done on Arches CP block, 7 x 10. I was pretty happy with most of this, I'm not sure about the sun spot shining through the branch of the tree, though. It was a very nice aspect of the photo. . . Maybe I didn't do it correctly. I masked the circle, painted the sky and the tree branch. I let it dry completely and then removed the mask, I used a wet brush to soften the edges. While that area was still damp, I dropped in just a haze of the brown/rust and then let it dry. I followed up with some strokes using the same pigment mix. It just looks "funny" to me, like it doesn't fit.
I AM enjoying using this triad and am getting somewhat accustomed to having no green - ha ha.
Wednesday, January 23, 2008

Jazz Alley Triad - Winter
This is from a photo on WetCanvas. It was posted along with two other winter scenes that were a January challenge. I decided to try this one using the triad. Since there's no green or yellow, I made the evergreen trees rust - :) I have to admit, I'm getting obsessed with this triad. I find it VERY challenging!! We are supposed to get snow where I live tonight and tomorrow, so maybe I'll be able to get out and take my own "winter" photos.
It is painted on Arches CP block and is 7 x 10.

Jazz Alley Triad - Bee on Lavender
I'm still searching for subjects to paint using JUST the pigments in this triad. I've found a few flowers and insects to add to my sunrise/sunset photos. I am finding that I REALLY need my yellows - LOL! After I finished this, I realized that for this lavender sprig a light grey would've been more effective to portray the fuzzy coating of the lavender pods. I just might attempt this one again, it was fun to do the bee. I think this may be the first insect I've ever painted.
Tuesday, January 22, 2008

Daniel Smith's Jazz Alley Triad - Desert Sunset
WetCanvas has an upcoming challenge for February to paint something using ONLY the DS triad called Jazz Alley. I've never participated in a WC challenge and thought maybe I'd try this time. The triad is challenging in itself! The pigments are Indigo, Quinacridone Sienna and Deep Scarlet. So, there's NO green and there's NO yellow to make a green! I can mix up some nice lavender and a nice range of terra cottas, but oh my! this challenge is going to be challenging in just finding subjects. Sunrises/sunsets will fit the bill, so that's what I've attempted here. I poured the sky (my first pouring experience) and then when I painted in the mountains, the sky was still damp and so I got runs and my mountains looked like volcanoes erupting - LOL! After the paper was completely dry, I tried to give some solid shape to those eruptions!! Rather than completely covering the runs, I decided to leave the tops just because they were unexpected. I hardly ever have the opportunity to use my rigger brush and really love it - it was fun to do the bare tree with such a fine tool!
Thursday, January 17, 2008

Watersoluble Graphite Sketch with Watercolor Pencil
I couldnt' resist. . . I had to see what would happen when I added COLOR! I used Derwent Inktense Pencils and found that the graphite did reactivate just a little bit when I added water to the watercolor pencil lines. After it was completely dry, I touched up some of the graphite lines and then dabbed a bit of water on them. This was a fun experiment and now I'm REALLY eager to see what the graphite does with watercolor tube paint.

Watersoluble Graphite Pencils
I bought a set of these pencils (Cretacolor) back in July and had not even given them a test run yet!! Yesterday my friend, Irene, and I went to DBs in Pasadena and I talked her into buying some and so figured I probably should try out my own set - LOL! Last night I drew this simple little still life using the 4B pencil. After the initial drawing, I wet it with a brush and water and let it dry completely. Then I used the 8B pencil to add some darks and brushed those areas with water. Once water is added, the graphite is "set." When water is added, the lines just instantly melt -- it's really neat! Now that I've given this new/old toy a test run, I'm eager to try something a bit more complex. Kate's watercolor pencil class starts in a couple of weeks, so I'm gearing up for that and now am wondering what would happen to do a mixed media with these pencils and watercolor pencils or tube watercolor -- the graphite could certainly be effective as an underwash for shadows!!
Here is where I bought my set http://www.fineartstore.com/Catalog/tabid/365/List/1/CategoryID/13320/Level/a/Default.aspx
Subscribe to:
Comments (Atom)