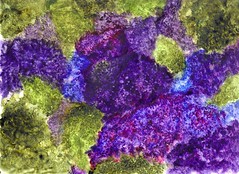
If I didn't have a title, no one would be able to figure out that I was trying to paint hydrangeas! This was much harder to pull off than I thought it'd be. I am still having fun with Yupo and have some ideas for something a bit different. . . we'll see how it goes. One thing about this support, if you don't like it, just put it in the sink and wash it off - ha ha.
Monday, June 30, 2008
Thursday, June 26, 2008
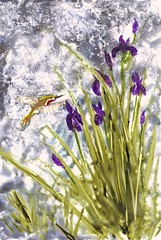
Hummingbird and Wild Flowers on Yupo
DS paints on Yupo. I masked the area for the bird, then I sprayed the sheet with water. I applied the gray background, smashing of pigment onto the Yupo as I've done the previous works. Then I used the side of the flat brush and painted in the leaves. Just before it was dry, I used the same brush and wiped out some lines in a few of the leaves. I let the piece dry completely before painting the flowers. Then I finely misted the flowers (using my hand as a shield to keep from getting water on the leaves. I pulled the mask off, which was hard to do on this because you can't really rub the painted area too hard. Truly, it would have been easier to just use a brush and clear water and wipe out the area for the bird. Then I painted the bird.
Wednesday, June 25, 2008
CA Wildflowers on Yupo
I wanted to see if I could do something besides a dark forest scene! The ref photo for this was one taken near the little town of Gorman. During "good" wildflower years, the mountains there look like someone flew over in an airplane and poured gallons and gallons of colored paint all over the mountains and valleys -- it's just beautiful! Someone asked how long it takes for my layers to dry on Yupo and I'm afraid I can't answer that. The first layer is the wettest because I've sprayed the Yupo pretty heavily with water and then add pigments. The successive layers are heavy pigment and then a fine spray of water (from an empty hair spray bottle) and I work under a light so I make sure I'm not spraying too much water. Sometimes I don't spray enough and after that first spray has dried, I'll spritz it again. I live in a very dry climate so my Yupo paintings probably dry faster than the norm. I do a layer and then go do housework, laundry, run errands (really whatever it is I need to do). It usually takes me about 6 hrs to complete one painting -- but the ACTUAL painting time is only about 1 hr.

Tuesday, June 24, 2008
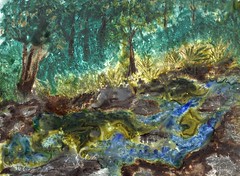
Stream in the Forest on Yupo
I think I'm getting a handle on this technique. . . my paintings are looking at least a little similar to the photo refs. I'm still using DS paints. I truly love working on Yupo, it's so unpredictable and spontaneous.
Monday, June 23, 2008
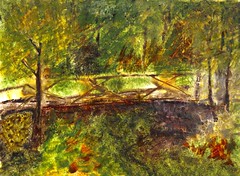
Forest Bridge on Yupo
Another expressionistic piece on Yupo using DS paints. This one is actually pretty close to the ref photo, which I found on WetCanvas. It has multiple layers and multiple water sprays -- I honestly lost count, but there are at least 6 layers in some places. I'm continuing to have a blast with this technique on Yupo.
Thursday, June 19, 2008
Lagoon on Yupo
This is the first Yupo I've done lately that actually is similar to the photo ref! Also, this is more impressionistic than yesterday's (which most defnitely was expressionistic with a touch of abstract) LOL! I'm still having a blast working on Yupo and still using DS paints.

Wednesday, June 18, 2008
TREES AT CANYON EDGE
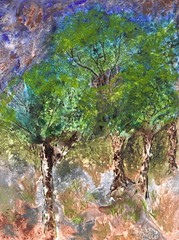
I can't believe how much fun I'm having with Yupo and watercolor!! This one started out to be Joshua Trees in the desert - LOL! Yupo really dictates what it wants to be -- so, trees at the edge of a canyon drop is what we have here! I really loved how the paint for the tree bark reacted. I keep forgetting to tell the sequence of painting these. . . choose the subject or photo ref first (I don't know why, because it doesn't turn out to be that anyway), choose your palette and squirt some paint in the pans (keep it moist -I'm covereing my palette with Press and Seal plastic wrap), spray the Yupo with a bit of water (enough so there are visible drops all over, but not running), using a large flat brush apply the pigments to the Yupo (do NOT add water to the pigments in the palette pans), squish and stroke the paint all over the Yupo putting your colors in the basic area that the photo ref shows you. Let dry. After it dries, see what it wants to be and then proceed by lifting paint and/or adding paint. Squirt with water - just a little fine mist. Let dry in between each layer and add a few little details if you want and call it done!
I can't believe how much fun I'm having with Yupo and watercolor!! This one started out to be Joshua Trees in the desert - LOL! Yupo really dictates what it wants to be -- so, trees at the edge of a canyon drop is what we have here! I really loved how the paint for the tree bark reacted. I keep forgetting to tell the sequence of painting these. . . choose the subject or photo ref first (I don't know why, because it doesn't turn out to be that anyway), choose your palette and squirt some paint in the pans (keep it moist -I'm covereing my palette with Press and Seal plastic wrap), spray the Yupo with a bit of water (enough so there are visible drops all over, but not running), using a large flat brush apply the pigments to the Yupo (do NOT add water to the pigments in the palette pans), squish and stroke the paint all over the Yupo putting your colors in the basic area that the photo ref shows you. Let dry. After it dries, see what it wants to be and then proceed by lifting paint and/or adding paint. Squirt with water - just a little fine mist. Let dry in between each layer and add a few little details if you want and call it done!
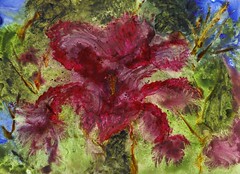
Yupo Iris
My second attempt using Taylor Ikin's technique. This started out to be a cherry blossom -- can you believe that? But as it flowed and dried, the Yupo and paint decided it wanted to be an iris. So. . . being the dutiful artist, I let it! My subsequent layering tried to mold this into an impressionistic iris. I have to say, I'm having a BLAST working with this stuff and trying out this technique. I think I spray it with water more than Taylor does, but hey, we've gotta add our own signature, right? Btw, I'm using DS paints on these Yupo paintings.
Tuesday, June 17, 2008

Dark Woods Stream on Yupo
Woa! Impressionistic, Dark, Bold!! This is something VERY different for me!! I LOVE working on Yupo and I think it's because it forces me to be loose. I love how the paint chooses where it's going to flow and you either follow the paint or suffer frustration. I viewed a fantastic video last night called "Dancing with Yupo" by a wonderful artist, Taylor Ikin. Taylor teaches how to lay down heavy paint and then add brush strokes and water and really just let it do it's own thing. You can coax a little here and there and model the paint here and there, but ultimately the paint is going to decide what the painting turns out to be. This was fun and certainly not even close to what I would hope it would be, but I'm satisfied with it as my first attempt at this style. Take a look at Taylor's work here http://www.taylorikin.com/index.htm I think you will be blown away!
Tuesday, June 10, 2008
 Misty Mountain Road
Wow - this was TOUGH! I'm afraid I picked a difficult ref photo over at WetCanvas, but I just loved the scene and couldn't pass up the challenge. I haven't painted in a while, because I've been taking art journaling classes and been busy keeping up with lessons, and so I'm quite rusty with the brushes! I did a little resarch through my personal art library on painting fog or mist. Many tips and techniques are written about this effect, and many have one area of agreement. . . paint wet-in-wet. Also, it seems that most agree that lifting with a tissue will give a fog effect. That good old master, Edgar Whitney, suggested using an atomizer to mist with water and then I read that Susan Bourdet likes to use white goauche. So, I decided to try all the above - LOL - and since I really love using my little atomizer and hardly ever do, it was a natural little toy to resurrect. I used white goauche with just a smidgeon of payne's grey in my atomizer and just misted the heck out of this. What fun -- I just LOVE old-fashioned tools of the trade. For those of you who may not be familiar with this little goody (that gives an airbrush effect), you can see it here http://www.dickblick.com/zz034/00/ There is a trick to working this effectively, the tube that runs vertically will move -- it fits in it's sleeve stiff, so it takes a little bit of pushing. You have to push it up so that it touches the tube that runs horizontally (which is the one you blow through). It needs to be up above the edge of the horizontal one, actually almost to the top edge of the horizontal one. And that's the secret, you just blow through the mouthpiece and a super fine mist comes out. Be sure to use a piece of paper to shield areas you don't want sprayed, though. A little "helper" that I figured out the last time I used this is one of those plastic vials that cut flowers sometimes come in. I fill the vial with my medium and then put the atomizer tube in it and it's quite easy to hold them together with one hand, freeing up my other hand to hold the paper shield. Fun! And it truly DID make a huge difference in this painting -- the wet-in-wet and lifting with a tissue didn't work that great for me. Possibly because it's so blasted hot and I live in the dry desert and I couldn't keep my paper wet!
Subscribe to:
Posts (Atom)